DIY Raised Cinder Block: Water Feature Edition


Have you guys ever seen something in someone else’s house that you wished you could have in your own space? For me, it was a gorgeous outdoor water fountain Steve and I saw in a show home we toured. I vowed long ago not to wait for my dream home before I have things I love. So, I decided right then and there to build my own outdoor water fountain. Follow along with our progress (and mistakes!) to see how we created our very own DIY backyard water feature using cinder blocks, hard work and problem solving.
This all started because we decided to rip out our old raised flower beds that we built out of wood some years before. You can see all the reasons we did this right here in the post I wrote about ripping them out and building a new set of planters. We wanted another new raised planter bed AND we wanted to include a backyard water feature DIY with it somehow. So, that’s how this new project was born!
This post contains affiliate links. I make a small commission if you choose to buy any of the products I am endorsing. The opinions in this post are my own, and I really do love all the tools and products I am using for this project.
How do you make a simple water feature?
First, you have to decide on the style you want. The look I’m going for in my backyard is casual Italian villa, so I knew I wanted a purposeful modern fountain look. If you’re into more natural elements, you could create something that looks more like a backyard pond, complete with water lilies. This would fade into the background of your outdoor space a bit more.
Remember that as long as you have a submersible pump you can make a water feature out of just about anything. Flower pots, pretty old kettles, or a wine barrel with a stack of large stones all make great fountains too! So, it’s really about the effect you are trying to create. I chose cinder blocks and I also decided to divide the structure into three equal parts: a fountain in the middle and garden beds on either side of it.
Because I wanted to make my DIY fountain look modern and sleek and because I wanted to combine it with a raised planter box, I chose cinder blocks as my fountain material of choice. Both cinder and concrete blocks are available in the shape I needed for this project. I decided on cinder blocks instead of concrete because I wasn’t using the blocks for structural purposes in a building and I wasn’t making my garden bed and water feature particularly tall or complicated. So, I didn’t need to worry about strength or durability. Cinder blocks are cheaper and lighter than concrete so they were a good choice for this project.
Leveling the ground
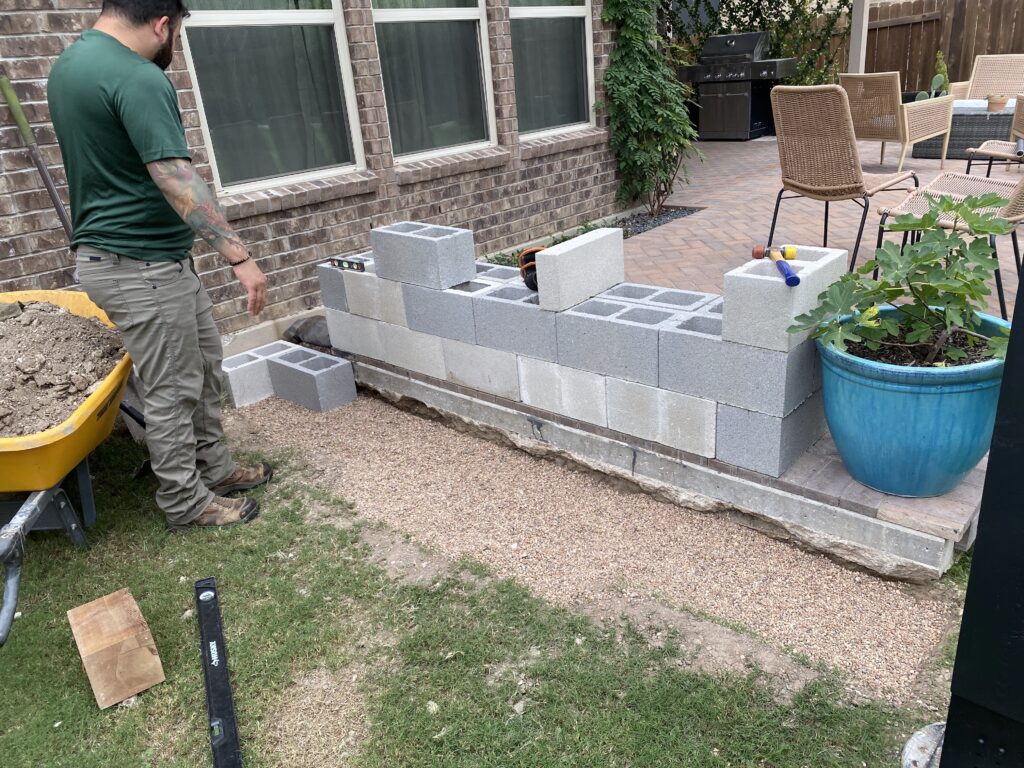
The first thing you need to do if you’re building your backyard water feature DIY from cinder blocks is to make sure the ground you are building it on is completely level. This is essential both so it looks right and so that it functions properly. The first thing we did was lay pea gravel down as the base for our fountain to sit on. Not only will this material make a sturdy base, but it is also easier to level than bare dirt. This is because it’s much easier to build up or remove than the actual ground would be. This time I was lucky enough to have Steve helping me, so he was the one who leveled each block in the first layer.
Lay your blocks
Once you have put down your gravel, it’s time to lay the first block! This block MUST be level or your entire garden bed will be off, so take the time to get it right. Lay the block down where you want it to sit and put your level on top. The air bubble needs to be in the center of both the vertical and horizontal vials.
Once it is level, place the next block down next to it (really close, as you don’t want any gaps between your blocks). If it isn’t level, add some gravel or take some gravel away as you need. You can use a rubber mallet to help you make small adjustments if necessary too. It really is worth getting every single block in your first layer completely level. I promise the rest of the building process will go so quickly once you finish this part!
A word about block placement. Since cinder blocks are not as sturdy as concrete, I wanted to do everything I could to make my planter box and beautiful water feature hold up over time. So, I had the good idea to make sure the blocks didn’t all line up completely. This would have made a single line of weakness where the blocks all butted up against each other. Instead, I staggered them so that the edges wouldn’t line up in the first and second layers of blocks.
Add the glue
Once the base layer of blocks was down and leveled out, we made it even stronger by adding Loctite construction adhesive. Just remove the blocks one at a time from their set position, add the adhesive to the ends, and then put them back in place. And of course, after I put each block back in place I checked that it was level again, making little adjustments here and there with my trusty mallet. I highly recommend this step, as it will make your garden boxes into one solid piece and help prevent your blocks from settling separately over time.
We did two lines of cinder blocks and a little bump out where the fountain would go. We dumped sand inside the cinder block rows to fill in the little spaces between the gravel to lock it all in place. Then, I filled the blocks with the dirt we moved out of the way when we demolished the raised wooden beds that used to sit in the same space. All this made me feel very confident that my fountain wasn’t going anywhere!
Add your second layer
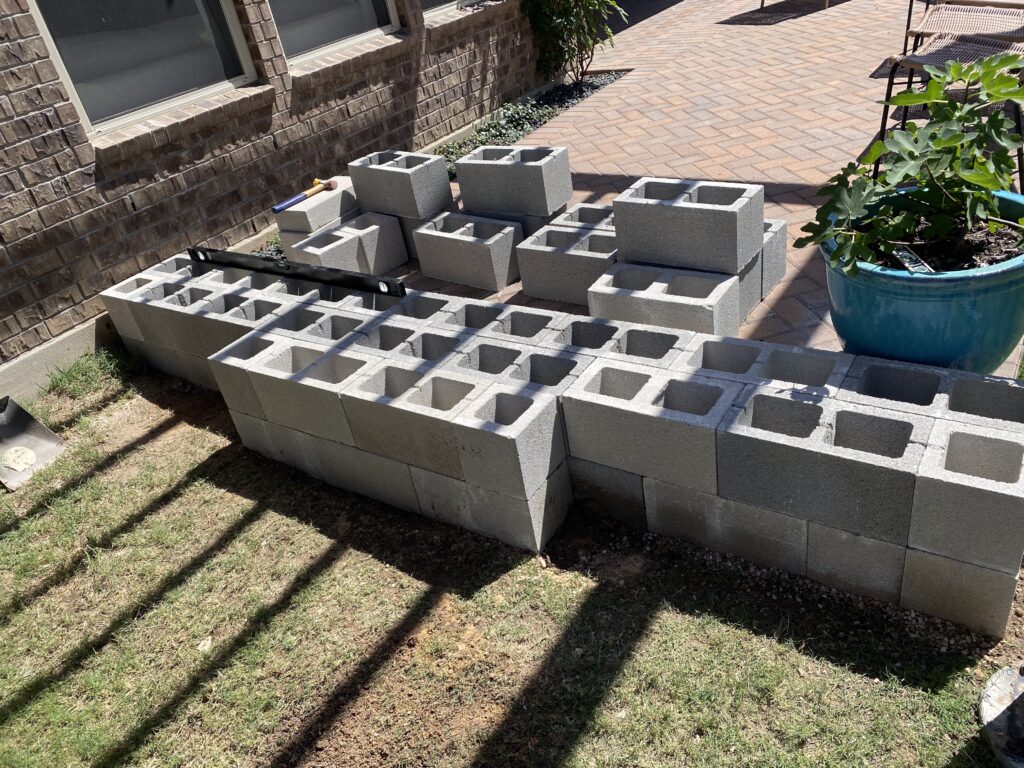
Now that you’ve done the hard work of leveling each and every block for your first layer, the second layer is going to be so easy! Because I knew the base layer was completely level, all I had to do was put the next layer on and glue them together. I placed the first block of the second layer in the opposite direction as the one underneath it to continue my goal of making sure the weak butted-up ends of the blocks don’t all line up with each other. Congratulations! You are now finished the main construction of your cinder block garden bed and fountain!
I left the section of cinder blocks that formed the back wall of the fountain section of this structure loose (unglued) because we needed to figure out how the plumbing would work back there. We needed to be able to move the blocks around for that.
Add your third layer
Now that the main structure is built, it’s time to add the third layer of blocks. I used a different kind of block this time: top caps! These are still made of the same cinder block material, but they are a different shape. They are solid and measure 2 x 8 x 16″. They are the same length and height as the cinder blocks, so by gluing them together with construction adhesive I was able to create a border “wall” on top of the second layer of cinder blocks that is exactly the same length as the rest of the planter box structure. I just put glue on the top of the second layer and on the sides of already-placed top caps where I wanted the new block to sit, and then I used my mallet to bang it gently into place.
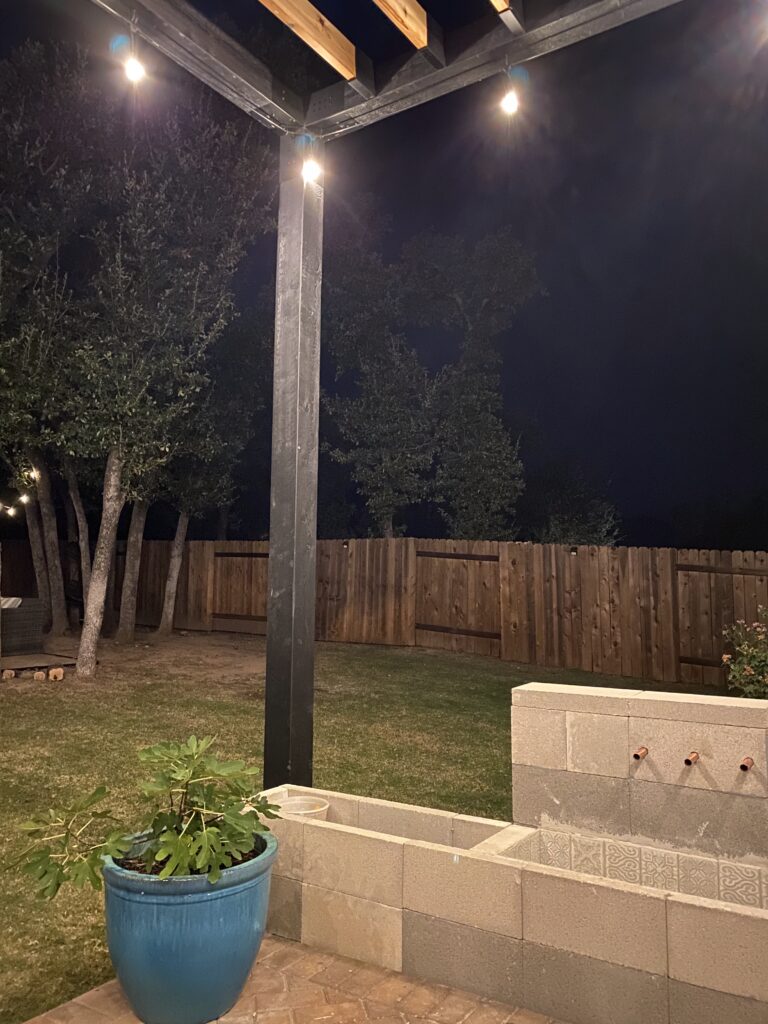
This doesn’t feel big enough to be its own step, so I will just mention that we added a small fourth layer of cinder blocks on top of the third concrete cap layer where the bump out is. This is where the water pipes for our fountain’s flow will actually come out and be visible.
Watch the Video to Learn How to Build a DIY Backyard Water Feature
Creating Your Own DIY Water Fountain
After I finished the main structure, it was time to create the actual fountain part of this project. Let me tell you, this really tested our DIY skills in a very serious way! I’m going to be honest with you and share our whole process start to end, mistakes included. Please read to the very end BEFORE you start so you avoid the mistakes we made!
What do you need for a DIY backyard water feature?
To create a water feature with running water, all you need is some kind of reservoir and a pump to keep the water moving and flowing. Sounds simple enough, doesn’t it? But it was actually really difficult to figure out how to properly build a water reservoir for our outdoor fountain! I tried to find experts but it did not seem seem like many people build outdoor fountains on a regular basis. It was hard to get advice and we ended up doing the best we could with the information we had. That means we had some bumps along the way, but I promise if you follow along our fountain story turns out OK in the end!
Getting the Pump Sorted
We decided to use a small pump that is powered by a small solar panel with a battery backup system. We didn’t want the use of extension cords running to the house to clutter up the space behind the fountain. Where I wanted to build my fountain wasn’t really in reach of an exterior outlet anyway. Decide what kind of power source works best for your own outdoor living space.
Once we decided on a power source, we had to figure out how the small water pump we purchased was going to attach to the water line and make our fountain actually work! Steve went to the hardware store and bought a series of attachments, adapters and piping. Then it was just time to play with the plumbing and see what worked best.
What can I use for an outdoor water line?
We learned that there are three common options for an outdoor faucet’s supply line – copper, PVC, and PEX lines. We read that copper pipes are ideal for exposed plumbing and outdoor faucet piping, so that’s what we did! Plus I just think it looks pretty and elegant! This is what I wanted for this addition to my outdoor oasis. But you could use the other two options if you wish. We did use PEX line for the behind-the-scenes plumbing that no one sees because it is flexible and therefore easier to work with when you’re running lines through cinder blocks.
Steve decided to attach the pump to the PEX line and then drill a hole in one of the blocks in the second layer of the structure. This meant it would run up the inside of the back wall (in the hollow space of the next block up). Then it would attach to the copper pipes at the top. And hopefully, the end result would be a beautiful water wall with no evidence of where the water was being pumped from.
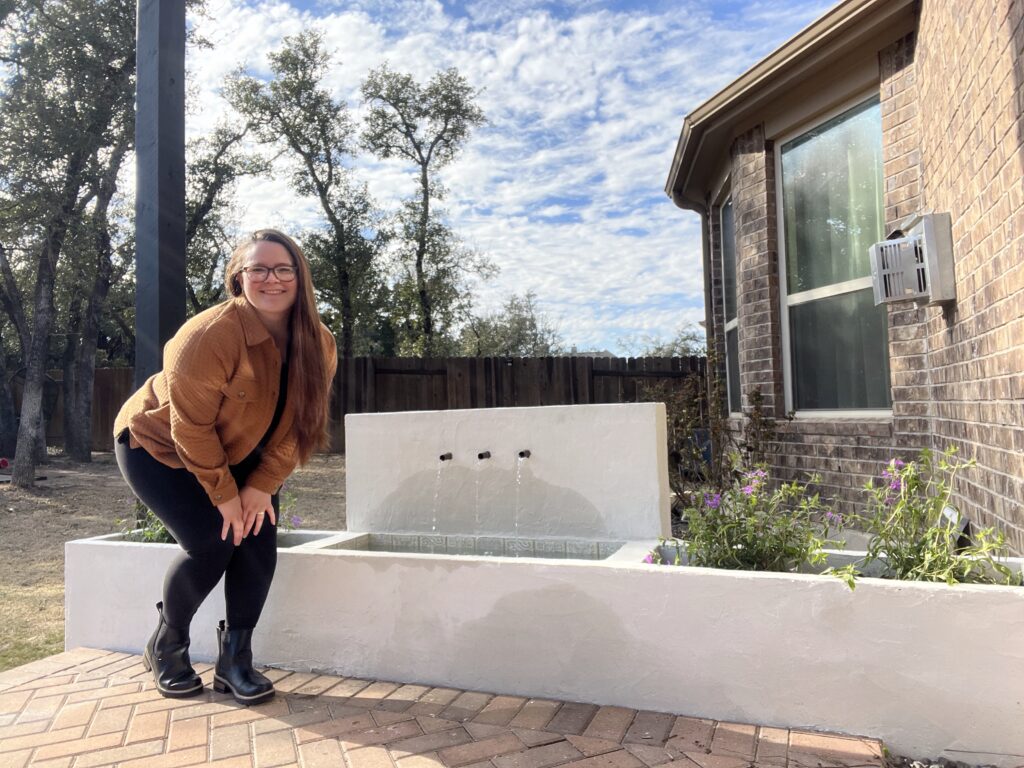
He built the copper tubing when the PEX line was run. We decided on three connected spouts. He drilled three holes in the concrete cap piece in the right positions for the ends of the copper pipe to peek through and pour water. I was really excited about the copper spouts because I knew they were going to be the perfect elegant touch to our beautiful fountain when it was all finished.
The Water Reservoir
While Steve was playing with the pump, pipes and PEX lines, I was busy building the water reservoir. This was where the pump would draw from and the copper pipes would pour into. It was very difficult to find information on waterproofing! I decided to tile the walls of the fountain. Using a tile cutter I cut them down to the size I wanted. Next, I installed them on the inside walls. I used river rocks (any smooth stones will do) to line the bottom. First I put down a piece of cement board, then the rocks, and then I grouted them into place. It looked so, so pretty. After the grout had fully cured, we filled it up with water to test it out.
Testing the Fountain
It was the moment of truth! We turned on the pump and held our breath. The water flow started but only went to one of the copper pipe ends. We checked the battery power and the setting the pump was on and everything should have been working. It just…wasn’t! Steve did some troubleshooting and realized that the pump itself was fine. However, we had attached the tubing to it incorrectly. So, there was not enough pressure to pump the water to all three pipes. He made some adjustments and made sure the line was unobstructed. Then we tried again.
It worked! This time when we turned it on, we heard the sweet music of a softly trickling garden fountain. AMAZING. I wanted to celebrate but there was a lot more to do before I could consider our solar water fountain complete.
Finishing touches on our DIY backyard water feature
Now that we were sure the fountain worked properly, I had to do something about the back of the fountain. We had left it open to keep the plumbing available while we made sure everything was working properly. I went back and forth between two options. I could glue all the cinder blocks in place and seal it up properly. Or, I could leave a door so we could access the inner workings if we need to in the future. It would have looked best if I had sealed it all up properly, but I just couldn’t do it. So, I glued most of the blocks in place. But, I left an access hatch that I will cover later with some kind of door.
Finishing touches
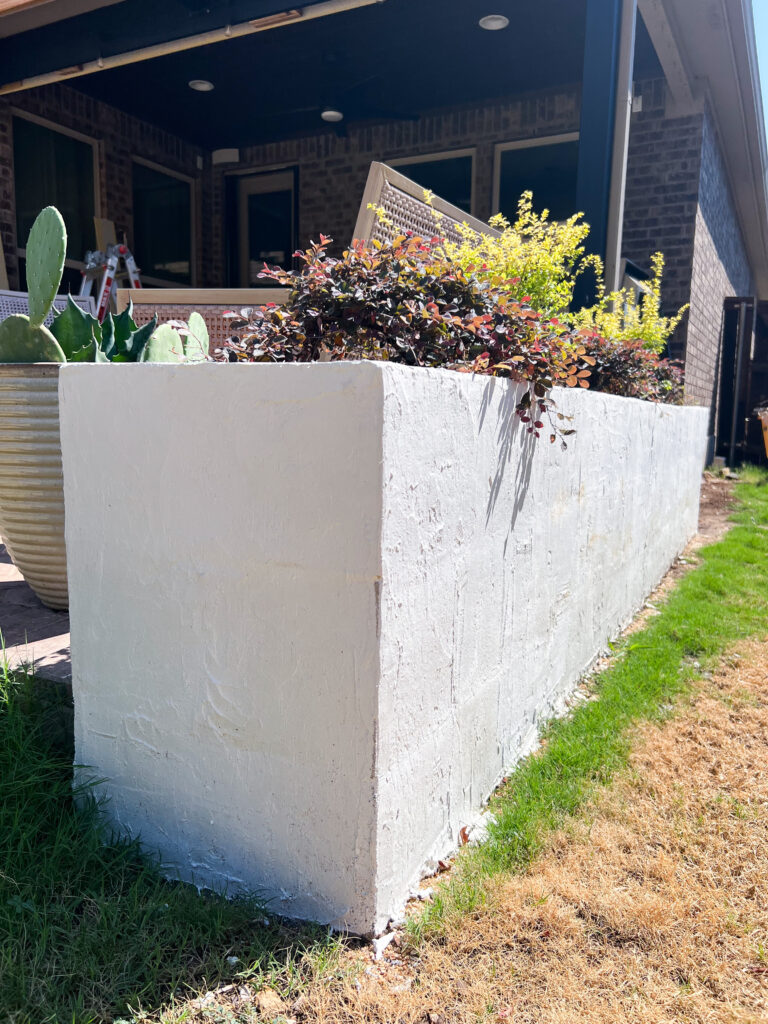
Almost done! I didn’t want my fountain to look like a pile of cinder blocks, so there was some finishing work to do. I used a layer of surface bonding cement to hide the lines of the blocks and give it a more full-concrete look. Mix your cement according to the package instructions, or add just enough water until it feels right to work with.
I sprayed down the cinder blocks with water before I started spreading the cement mixture. This way the moisture wasn’t instantly sucked out of the cement and into the blocks as soon as I put it on. (I forgot to spray one small section and I really noticed a difference! Don’t skip this step.) I didn’t smooth it too much as I was going for a textured look. It was easier to soften the lines with my trowel if I spread it out and then let it dry a bit first.
I applied the cement mixture from the bottom up. (Pro tip: Start at the least visible part of your fountain so you can practice where no one can see!) After each section was done, I misted it with my hose because this product needs to be water-cured. For the front of the fountain, I covered the reservoir with an old tabletop. This way the cement mixture didn’t fall into it while I cemented around the copper pipes above it.
Then I went to the hardware store and bought new plants for the raised beds on either side of my fountain. I could not be more pleased with how it turned out. This entire project cost about $600. Considering the solar fountain pump setup was $250, I think this is an incredibly budget-friendly DIY water feature for the backyard. I am so happy with it! And because we made it ourselves it has so much more charm than store-bought fountains. This small waterfall adds the perfect white noise to our backyard and I’m so proud that we pulled it off!
Update
So, I said we pulled it off. That is true. But, it took fixing one giant mistake first. We didn’t realize that the research we did/advice we were given was not correct when it came to waterproofing. Our fountain started leaking out the front. We realized it was because the grout I used to seal the rocks and tile was not quite waterproof. So, back to the drawing board! Because we were very uninterested in demolishing the reservoir and doing it again, we used a simple hack well-known to backyard DIYers everywhere: Flex Seal!
First, we drained the reservoir and let it dry completely. Then, we used a polishing attachment for the drill and shined up the surface of the river rock. Next, we vacuumed out any grout that was loosened in the process. Then Steve set the pump up on a board out of the way so he could work on the entire floor of the reservoir.
He painted a thick layer of Flex Seal over the river rock and up the sides of the tile. He did this to seal the grout lines where we think water escaped as the grout dried and cracked a bit. We let the product dry completely and were very careful not to get it wet during the curing process. Once it was dry, we filled it up and held our breath while we tested it. One week later, there was no leaking! So we considered it fixed and working.
Looking back with the knowledge I now have, I think we should have waterproofed it properly at the very beginning. This could have been done with some kind of waterproof membrane underneath the tile and river rocks. But in the end, what we did worked and I am so proud of us. This entire project just goes to show there you can always fix every mistake and problem solve every roadblock. I enjoy listening to and watching my backyard water feature DIY every single time I go near it! So, to me it was worth the work and all the steps we had to take to get here.
Have you attempted a backyard DIY that took a couple of tries to get right? Tag us @olivegreyavenue with your pics, we would love to see them!
Visit the following posts if you would like to see more of my Italian villa style backyard DIYs.
How to Build a Raised Garden Bed with Cinder Blocks
Cinder block beds can be arranged in all different shapes and sizes to work in whatever garden area you have at home. And, if you aren’t sure you love the look of the concrete block formation, I’ve got a great hack to make your bed look solid and modern. Let me show you exactly how I made mine.